
Water Tank Buying Guide
Guide to Water Tank Fittings & Accessories
When looking to purchase a rainwater tank, it’s crucial to look beyond just comparing brands, models and sizes. Understanding the necessary tank fittings and accessories is equally important. This guide will help you make an informed decision and avoid hidden costs that could arise from excluded fittings and accessories.
Main Tank Fittings and Accessories
Tank fittings are the inlets and outlets affixed to the holes in your water tank. Sometimes the inlet and outlet holes are cut at the factory, and the tank fittings are fitted either prior to or upon delivery. While not hard to do, you do need the right tools so manufacturers who provide this service can save you time and/or money.
Tank fittings are the inlets and outlets affixed to the holes in your water tank. These are typically pre-cut at the factory, with actual fittings installed either before or upon delivery. While installation isn’t particularly complex, having manufacturers provide this service can save you time and money.
Your water tank requires fittings and accessories in three key areas:
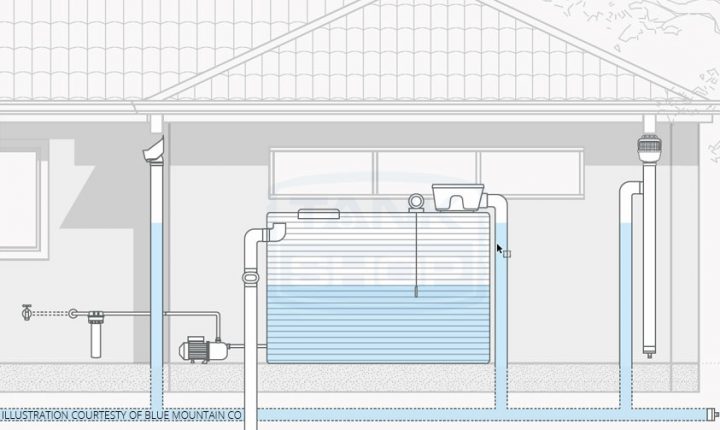
- Tank Inlet – Located at the top of your tank, a hole is normally cut out which allows rainwater to flow into your tank. A round Inlet Strainer is fitted here to filter incoming water. Many tanks come with standard strainers rather than custom-fitted ones. To prevent mosquitoes breeding it is important to ensure a tight seal around the edges of your strainer.
- Tank Outlet(s) – All tanks have at least one outlet installed at the base of the tank to use as a drainage valve and/or connection to an external pump (if you have one). It is important that the fittings used are compatible with your tank material to prevent corrosion (especially in steel tanks). Outlets are usually threaded to allow for a tap or valve attachment. Some tanks feature multiple outlets – one for hose connection and another for pump feed via a ball valve. Standard packages typically include only one 25mm / 1in outlet fitting, with additional outlets available for purchase.
- Tank Overflow – located on the upper side wall, this is where excess water will flow out of your tank when your tank reaches capacity. This is normally connected to a nearby stormwater drain, though you might instead choose to pipe it to your garden. It’s important that the overflow is not in a position that would cause your tank base to erode. It is good practice to purchase a screen for the overflow to prevent mosquitos entering the tank.
Water Pump Accessories
For plumbed installations, a Pressure Pump is essential to distribute water throughout your property. These also have have their own necessary accessories:
- External Pumps (installed next to your tank):
- Normally requires a flexible hose connection from tank to pump, absorbing ground movement and shock.
- To ensure warranty, most pump manufacturers also require installation of a Y-Strainer or Pre-Filter in the connection from the tank to pump to prevent debris and sediment from entering the pump.
- Adequate shelter from the elements is also required to ensure your pump warranty. Pump covers can be purchased or made yourself. Some pump covers help to reduce noise as well as protect your pump from weather.
- Internal (Submersible) Pumps:
- Installation generally requires a standpipe from the pump to the top of the tank where it can then be directed to house pipework.
- Installation generally requires a standpipe from the pump to the top of the tank where it can then be directed to house pipework.
- Rainwater to Mains Water Switch – this device is connected to the pump outlet and mains water connection and allows your rainwater supply to be prioritised and then automatically switch over to mains when tank level is too low or power is cut. This device is essential if plumbing your rainwater into your toilets or washing machine to ensure a constant source of water to those outlets. This device is reported to help reduce mains water usage by 40% or more. An rain-to-mains switch is sometimes included as part of a pump package, otherwise it can be purchased separately and used with any pressure pump.
Additional Tank Accessories and Extras
Besides direct fittings and accessories on your tank, there are various others that may/may not be included with your tank including:
- “Rainwater in Use” Sign – councils normally require beside any outlet that your rainwater is accessed from.
- First Flush Diverters – these help to improve the quality of water entering your tank and are often required by councils. When it rains, the initial litres of rainwater can contain debris and other contaminants. First flush diverters work by preventing this first flush of rainwater from entering your tank.
- Rain Heads (aka left eaters) – this accessory is a head piece that deflects leaves away from the downpipe that feeds rainwater into your tank. It is normally installed at the top of a downpipe just below your gutter.
- Gutter Guards – if your roof capture area is surrounded by trees, then you may want to install gutter guards. These prevent leaves from washing into your gutters, flowing you’re your downpipe and bits possibly making their way into your tank.
Site Preparation, Pipework and Plumbing Install
When purchasing a rainwater tank, you will need to prepare its foundations, install the PVC piping necessary from your gutter to rainwater tank, and organise plumbing if you will be using your rainwater throughout your property or home.
You can often save money on install costs by preparing tank foundations yourself. Some tank materials have different base requirements that need to be met to not void your tank warranty. Common tank foundations include sand, crusher dust, pavers and concrete, but it is important to refer to manufacturer instructions for base preparation. Unless planning to receive your tank later, you will generally have a lead time of 2-4 weeks after ordering.
PVC pipework normally isn’t included with your water tank since it varies drastically depending upon the location of your tank to downpipes. It also depends upon whether pipework will be installed as a “dry system” (above ground from gutters to your tank) or “wet system” (from gutters leading down and underground to your tank). If you have a bit of DIY talent, this is something you can plan out and do yourself buying the necessary pipework, glue, piping fixtures and the like.
Finally, if you will be plumbing your rainwater, then you will need to hire a licensed plumber. Councils normally also require a licensed plumber to install a proper backflow protection device, which ensures rainwater doesn’t flow back into the mains water network.
I hope this article has helped you to better understand what accessories are often needed you’re your rainwater tank. If it has, please share this article or our website with others. Should you have any comments or unanswered questions, please contribute by leaving a comment below.